Sunday, 4 August 2013

Tomato and red pepper pasta salad

We all know salad is supposed to be healthy but the traditional lettuce/tomato mix I've always found rather boring. So as I am trying to eat more healthily at the moment I have been seeking out some more exciting salads. This one is from the latest (Aug/Sept) Slimming World magazine. There are some others in there that I shall definitely be trying too but this is the first one.


Italian roasted tomato and red pepper salad

Serves 2 (original recipe is for 4 for I halved it - one for today (Saturday) and one for lunch at work on Monday)

200g mixed red and yellow cherry tomatoes, halved
1/2 tbsp dried basil
1 tsp garlic granules
Freshly ground black pepper
Frylight spray oil
150g dried pasta
100g roasted red peppers in brine from a jar, drained, rinsed and finely chopped
3 spring onions, finely chopped
40g rocket leaves
A handful of fresh basil leaves, roughly chopped
2 tbsp fat free dressing (I used Kraft light honey and mustard dressing)

1. Preheat oven to 160C/140C fan/Gas 3. Put tomatoes on a baking tray cut side up, sprinkle with the dried basil and garlic granules, season with pepper and spray with Frylight. Roast for 15-20 minutes, or until just collapsing, then leave to cool.


2. Cook the pasta for about 10 minutes. Drain, cool under cold water and transfer to a salad bowl.

3. Add the roasted tomatoes and any juices, peppers, spring onions, rocket and fresh basil and toss. Drizzle with the dressing, toss well again and serve garnished with the whole basil leaves.


This was peppery but very tasty, and I really enjoyed it. And healthy too :-)

Saturday, 3 August 2013

Baking on a too hot day!

So just over a week ago on one of the hottest days of the year my nearly 3 year old son Alexander insisted on cake making. I tried a number of different suggestions of other things we might do painting, racing cars, the paddling pool in the garden etc but no all he wanted to do was make cakes!! As there was no way that I was putting the oven on I decided on refrigerator cake. Having just treated myself to  Jo Wheatley's "A Passion for Baking" (only £5 at Sainsburys - a bargain!) I had a look through and fond just the thing. The recipe is below:

White Chocolate Tiffin

250g digestive biscuits
60g desiccated coconut
60g glacé cherries, washed dried and halved
125g unsalted butter
2 tbsp golden syrup
2 tbsp malted drink powder (E.g. Horlicks or Ovaltine)
1 tbsp caster sugar
500g white chocolate

The recipe suggests a 30 x 23 cm baking tin with a depth of about 4cm, although mine was slightly larger.

1. Lightly grease the tin and line with a sheet of parchment (I didn't grease mine but just used baking parchment)

2. Tip the digestive biscuits into a freezer bag and, using a rolling pin, crush them into smallish, random-sized pieces and tip into a bowl. (Alexander took the biscuit crushing very seriously!!). Add the coconut and cherries.

3. Tip the butter, syrup, malted drink powder and sugar into a small saucepan. Place over a low heat and stir until the butter has melted and the mixture is thoroughly combined. Pour into the bowl with the crushed biscuits and stir until evenly coated. 

4. Spoon the mixture into the prepared tin and press into an even layer. Leave until completely cold (I put the tin in the fridge as it was such a hot day!)


5. Break the white chocolate into chunks and melt in a heatproof bowl. (I did this using 30 second bursts on 50% power in the microwave, but you could melt it over a pan of simmering water). Stir until smooth, spread over the tiffin base and leave until set completely. (Again I did this in the fridge).


6. Once the chocolate has set, cut it into squares. 


Once cut, I kept it in the fridge, given how warm it has been lately. This went down very well at work and I'll definitely make it again.


Alexander loved it!!


Saturday, 20 July 2013

Baileys and Chocolate Cheesecake

This afternoon we are off to the annual drama group BBQ. We all take our own meat and then some of us take either a salad or a dessert and we have always enjoyed the event. I love the opportunity to make a dessert and usually go for something I wouldn't normally make for the three of us. This year's offering is no different. I have taken this cheesecake to other drama group events but absolutely love it, but don't dare make it unless I have an event to take it to as I would eat far too much!!! The recipe is taken from the BBC site: http://www.bbc.co.uk/food/recipes/baileysandchocolatec_72293 although I have adapted it. The springform pan I have is 22cm and the recipe 18cm. The quantities I used are listed below but if anyone wants to make it and has an 18cm pan use the quantities on the BBC site.

Baileys and chocolate cheesecake

125g butter
310g biscuits (the recipe suggests digestives, I used gingernuts this time)
740g Philadelphia cream cheese (full fat)
30ml Baileys (although I usually increase this to 50-60ml)
125g icing sugar
370ml double cream
125g grated chocolate (I usually use a mix of white and milk but use any variety)

To garnish
Recipe suggests whipped double cream and cocoa powder, but I've never used this. This time I crumbled a flake. Previously I have used homemade chocolate buttons (using Cadbury's chocolate), like the ones I used for the chocolate caramel cupcake, but you could use any decoration you fancy.

1. Crush the biscuits (I place in a large food bag and bash with a rolling pin)

2 year olds love doing the biscuit bashing!

2. Melt the butter in the pan and add the crushed biscuits, bashing any larger pieces left with a wooden spoon. Mix well until the biscuits have absorbed all the butter.

3. Remove from the heat and press into the bottom of a lined 22cm springform tin. Place in the fridge to set for at least an hour (I usually do this the day before).


4. Whip the double cream until thick (I used my electric hand mixer so took very little time.)

5. Grate the chocolate (I have never grated the chocolate I just bung it into my mini chopper, and although it comes out more like granules it's so much quicker and easier!)

6. Lightly whip the cream cheese, then beat in the Bailey's and icing sugar. I used my Kenwood kmix for this which I love, and was my 40th birthday treat. This meant I could use the shield so I didn't end up covered in icing sugar!

7. Fold in the whipped cream and grated chocolate (my kmix has a fold in setting for this so all done in the machine). When smooth, spoon evenly onto the biscuits.


8. If using a chocolate topping at this point I would decorate. So I crumbled my flake and sprinkled it over the top (barely resisting the urge to eat some chocolate). If using cream and cocoa powder I would wait until set and decorate not long before serving after removing from the tin. Once done, place in the fridge to set for at least 2 hours (again I made this the day before.)


9. Remove from fridge, carefully remove tin and silicone paper and serve (or in my case transport!)


Obviously there will be other lovely desserts at the BBQ but I am looking forward to having a small slice of mine too!!


Sunday, 14 July 2013

Halloumi and Harissa Salad

I treated myself to a subscription to the BBC Good Food magazine at Christmas and have loved discovering new recipes. This recipe was in the August 2013 issue and was really tasty. A very different way to serve broccoli and an opportunity to enjoy Halloumi, a more recently acquired taste thanks to my friend Hazel. The recipe was for four but I halved it, and ate it over two days. (I cooked the Halloumi fresh on the second day). The version below is the two servings version.


Halloumi with broccoli tabbouleh & honey-harissa dressing

140g couscous
150g broccoli florets
6 spring onions, finely sliced
80g cherry tomatoes, quartered (I used baby plum tomatoes)
Small bunch parsley, finely chopped (I didn't have any so didn't use this)
Small bunch mint, finely chopped
Juice of 1 1/2 lemons, zest of 1/2 lemon
11/2 tbsp extra virgin olive oil
1 tbsp harissa
1/2 tbsp clear honey
250g pack of halloumi, cut into 1cm thick slices (I used Tesco's reduced fat halloumi)
15g toasted flaked almonds (I just used plain flaked almonds)

1. Put the couscous into a bowl and cover with boiling water. Cover with cling film and set aside for 5 minutes. If the water has not all been absorbed at this point, taste to check the couscous is soft, and drain through a sieve. If not cooked leave a little longer.

2. Blanch the broccoli for 2 minutes, then drain well. Cut into small pieces or blitz in a food processor.
(I used my mini chopper which I love for little jobs like this - http://amzn.to/13bD82I).

3. Fork the broccoli, spring onions, tomatoes, herbs, 1 tbsp of oil, lemon zest and juice of 1 lemon through the couscous.

4. Combine the harissa, honey, juice of half a lemon and 1/2 tbsp olive oil and juice of half a lemon  with some salt and pepper for the dressing.

5. Heat a non-stick frying pan and cook the halloumi for 1-2 minutes on each side until golden. Divide the couscous between two plates, top with the halloumi slices and drizzle with the dressing, then scatter over the almonds.

This made a fantastic lunchtime meal which I will definitely make again. The harissa paste is quite hot so watch out if you're not a fan of spice. If you want to try this without the spiciness just miss out the harissa and add some more lemon juice instead.

Tuesday, 2 July 2013

Chocolate Caramel Cupcakes

It's Alexander's first sports day at preschool today and there was a request for volunteers to make cakes. Never one to refuse an opportunity to make cake I put my hand up! So I decided cupcakes would be the best option with children around and knew chocolate need to be involved and came across another Holly Bell recipe that I fancied trying. She calls them love cupcakes but I decided Chocolate Caramel Cupcakes was more my kind of heading. Anyway her recipe can be found here: http://www.recipesfromanormalmum.com/2013/01/21/love-cupcakes/ and is reproduced below.

Chocolate Caramel Cupcakes

Makes 12 (I doubled this recipe and got 42 but I think some of my cases must have been smaller!!)

Ingredients:
140g self raising flour
35g ground almonds
175g castor sugar
175g baking margarine/butter
3 large eggs (I used medium)
1 tbsp vanilla extract
Approx 60g caramel
100g milk chocolate
100g dark chocolate
Decorations

I started by making the decorations the day before although you could just use smarties, chocolate buttons etc. However, I have a fab buttons mould I got from http://www.bakedbyme.net/ who have some brilliant moulds and really fast and friendly service - highly recommended.


Next make the cakes, preheat the oven to 170C/Gas 3 and check there’s a rack in the middle of the oven. Then beat the flour, almonds, sugar, marg/butter, eggs and vanilla together until light and creamy. Takes about 4 minutes in a stand mixer, and I love an excuse to use my KMix! Divide between cupcake cases and then bake in the centre of the oven until just starting to brown and when a toothpick comes out of the middle cupcake clean. Remove from the tin and cool on a wire rack.


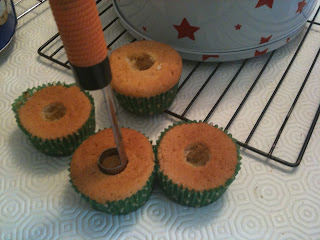
When cool take an apple corer and remove the centres of the cakes, being careful not to go all the way down to the bottom. If you accidentally do remove the whole plug of cake then cut a bit off and poke it back into the cake hole. 

Carefully pour a teaspoon of tinned caramel (or make your own) into each hole and then use a toothpick or skewer to poke the caramel down. It’s so gloopy it may well get stuck on the top so help it along with a poke and a jiggle. (Personally I used a spoon to pur it into the holes, and a clean finger to push the caramel down).


You'll be left with some cake to sample - which is no problem with a hungry 2 year old in the house!! This was supposed to be a bowl of leftover cake!!


 Then melt your chocolate in the microwave or over boiling water depending on your preference. i melted 50g of plain chocolate and 50g of milk chocolate at a time. I usually put it on for 30 seconds full power in the microwave and then at 30 second intervals on 50% power to ensure it doesn't burn.

Carefully spoon a teaspoon or two onto each cake, then pop whatever decoration you have on the top and leave to set (keeping the chocolate out of reach of the 2 year old was rather challenging here!!)


So here they are ready to go off to Sports Day and the verdict - delicious! Would definitely make them again. Here's hoping it doesn't rain this afternoon!


Sunday, 23 June 2013

Impromptu chicken dinner

I had been planning to cook a chicken tagine last night but ran out of time for the 2 hours cooking time. So after a quick search on the BBC Good Food site decided to make honey and lemon chicken and it was absolutely gorgeous. It was also a one pot meal so easy and less washing-up - always very welcome.

So the link to the recipe is here: http://www.bbcgoodfood.com/recipes/3233/succulent-honey-and-lemon-chicken but I reduced it to serve 2 and added some extra vegetables so as to make it truly one-pot/chuck it on the plate meal! So my version everso slightly adapted from the BBC Good Food recipe is below:

Honey and Lemon Chicken - serves 2
2 lemons
25g butter (although I'd probably put a bit less in next time)
1 1/2 tbsp clear honey
Leaves from 2 sprigs of rosemary
1 crushed garlic clove
4 chicken pieces e.g. thighs and drumsticks (I used thighs, you could use 2 chicken breasts instead)
400g new potatoes (cut in half)
1 red, yellow or orange pepper cut into into 8-12 pieces
1 large onion cut into 8


1. Preheat oven to 200C/Gas 6/fan180C.

2. Squeeze the juice from 2 lemons into a small pan and heat with the butter, honey, rosemary, garlic and salt and pepper, until the butter melts and it smells fragrant.


3. Lay the chicken in a roasting tin – don’t pile it up or it won’t cook so well. Add the potatoes and drizzle with lemon butter to coat evenly. Cut the second lemon into 8 wedges and tuck them in. (Can be made up to 2 hours ahead up to this point.)

4. Roast for 50 minutes - 1 hour until the chicken is cooked and the potatoes are crisp and golden.

Serve with the lemon butter drizzled over.

Note: I roasted it for 30 minutes at 220C (fan) as I was short of time.

And here was the finished meal:


Very tasty but as I said I would put a little less butter, maybe 15g when making it again.

So another win for the BBC Good Food website. I use this site all the time as well as gaining recipes from the magazine itself. I definitely recommend the site if you haven't used it before.

Saturday, 22 June 2013

Birthday biscuits

In honour of my Father-in-law's birthday I tried out a new recipe this morning. I've been looking for a good peanut cookie recipe ever since trying some given to my Mum which were divine. I keep meaning to ask my Mum to see if she can find out the recipe but in the meantime this recipe was pretty good.

Jo Wheatley's Peanut Butter Cookies

Makes about 15 (although depends how big your spoon is!)

Ingredients:
- 100g unsalted butter, softened
- 100g peanut butter, either smooth or crunchy
- 60g demerara sugar- 60g caster sugar
- 1 large egg, beaten
- 100g plain flour
- 1/2 tsp baking powder
- 1/2 tsp bicarbonate of soda
- 60g salted peanuts or chocolate chips (I used plain chocolate as this is my father-in-law's favourite)

1. Preheat the oven to 180C/Gas 4.
2. Cream the butter, sugars and peanut butter together until light and fluffy.
3. Gradually add the egg and mix thoroughly.
4. Sift the flour, baking powder and bicarbonate of soda into the bowl and mix until the dough comes together. Add the peanuts or chocolate chips and mix again.
5. Place scoops onto a prepared baking tray (lined with parchment) allowing plenty of space inbetween for spreading in the oven.
6. Bake for 5 minutes in the middle of the oven, remove the tray and give it a sharp bang on the work surface to deflate the cookies.
7. Return to the oven for 5 more minutes until golden brown. Cool slightly on the tray and then transfer to a wire rack to cool.

Recipe is taken from: http://www.recipesfromanormalmum.com/2012/06/03/jos-peanut-butter-cookies/

However I liked the recipe so much that I bought the book it is from which is A Passion for Baking by Jo Wheatley. It is currently available for only £5 and free delivery from Sainsburys here:
http://www.sainsburysentertainment.co.uk/en/Books/Hardback/Jo-Wheatley/A-Passion-For-Baking-Sainsbury-s-Exclusive/product.html?product=E11076373

I'm looking forward to trying more of her recipes.

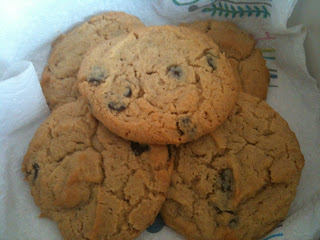
Anyway here are the finished cookies:


We took some over to my father-in-law and he liked them so much he even phoned to tell me! Praise indeed! We enjoyed ours too, very light and you can really taste the peanut butter. Next time I make them I shall give them a try with peanuts rather than chocolate and really must track down that other peanut butter cookie recipe :-)

Sunday, 16 June 2013

Testing new baking pan

I have a slight addiction to buying new bakeware and new gadgets for the kitchen. My latest purchase is a baking tray for individual traybakes from Lakeland - http://www.lakeland.co.uk/14230/My-Kitchen-Individual-Traybake-Pan. So perfect for brownies. My first attempt wasn't great as they were a nightmare to get out of the tray. Reading feedback on the Lakeland site it would seem I wasn't alone in this experience. I had found that the brownies that hadn't spilled over the edges of the individual trays came out the easiest so I had another go, this time only filling each tray half full. This time the results were perfect. So this is the recipe I used (a family recipe we first found on the back of a Sainsbury's chocolate chip packet and which I've adapted over the years).

Chocolate Chip Brownies

130g (5oz) butter
350g (12oz) caster sugar
130g (5oz) self-raising flour sifted with 30g (1oz) cocoa powder
100g (4oz) plain chocolate chips
100g (4oz) pecan or walnut pieces (optional)
4 medium eggs (beaten)
1 tsp vanilla extract


1. Preheat oven to 170°C (fan) or 190°C (conventional).
2. Grease the individual traybake pan.
3. Melt butter and stir in sugar.
4. Beat in remaining ingredients and put into the greased tin. (I tend to use an ice cream scoop as it's easier to get into the pan). Make sure you only fill each compartment half full. Better to underfill than overfill!


5. Bake in a preheated oven 170°C (fan) or 190°C (conventional) for 15-20 mins.
6. Leave in tin to cool, then carefully place a palette knife down each edge and carefully lift out of the tin.


If you need to re-use the tin then you can lift the cakes out warm but do so very carefully. 

And the final result:


This recipe made about 15 pieces so you can do the last 3 in the tin again or do the remaining ones in a standard cupcake tray. I suspect cutting the recipe down to the quantities below would fit 12 exactly but I've not tested it.
98g butter
263g caster sugar
98g self-raising flour sifted with 22g cocoa powder
75g plain chocolate chips
75g pecan or walnut pieces (optional)
3 medium eggs
0.75 tsp vanilla extract

Next time I shall try this recipe to try and find an exact fit for the tin, and would welcome anyone elses recipes to try.